This is the multi-page printable view of this section. Click here to print.

Return to the regular view of this page.

Hackerhotel 2020

badge

The project

Welcome to Hackerhotel 2020, where you may check-out any time you want but you may never leave…

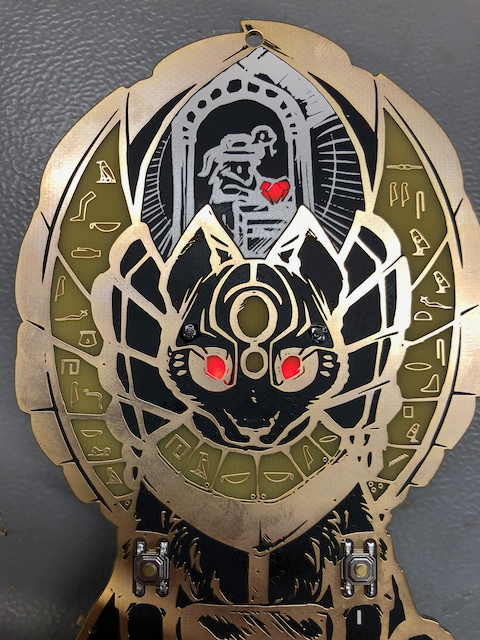
…just kidding of course, but our Egyptian cat goddess badge will be watching over you both during and after the event.

This badge is a bit different from our other badges: it’s a challenge badge. No apps, no Python, but instead a story for you to experience filled with puzzles and lore!

The Hackerhotel 2020 badge is a mixed reality escape room. Reminiscent of the classic ’text adventures’ but with interactions in the real world, it will present you with many challenges to overcome in both the virtual and the real hotel.
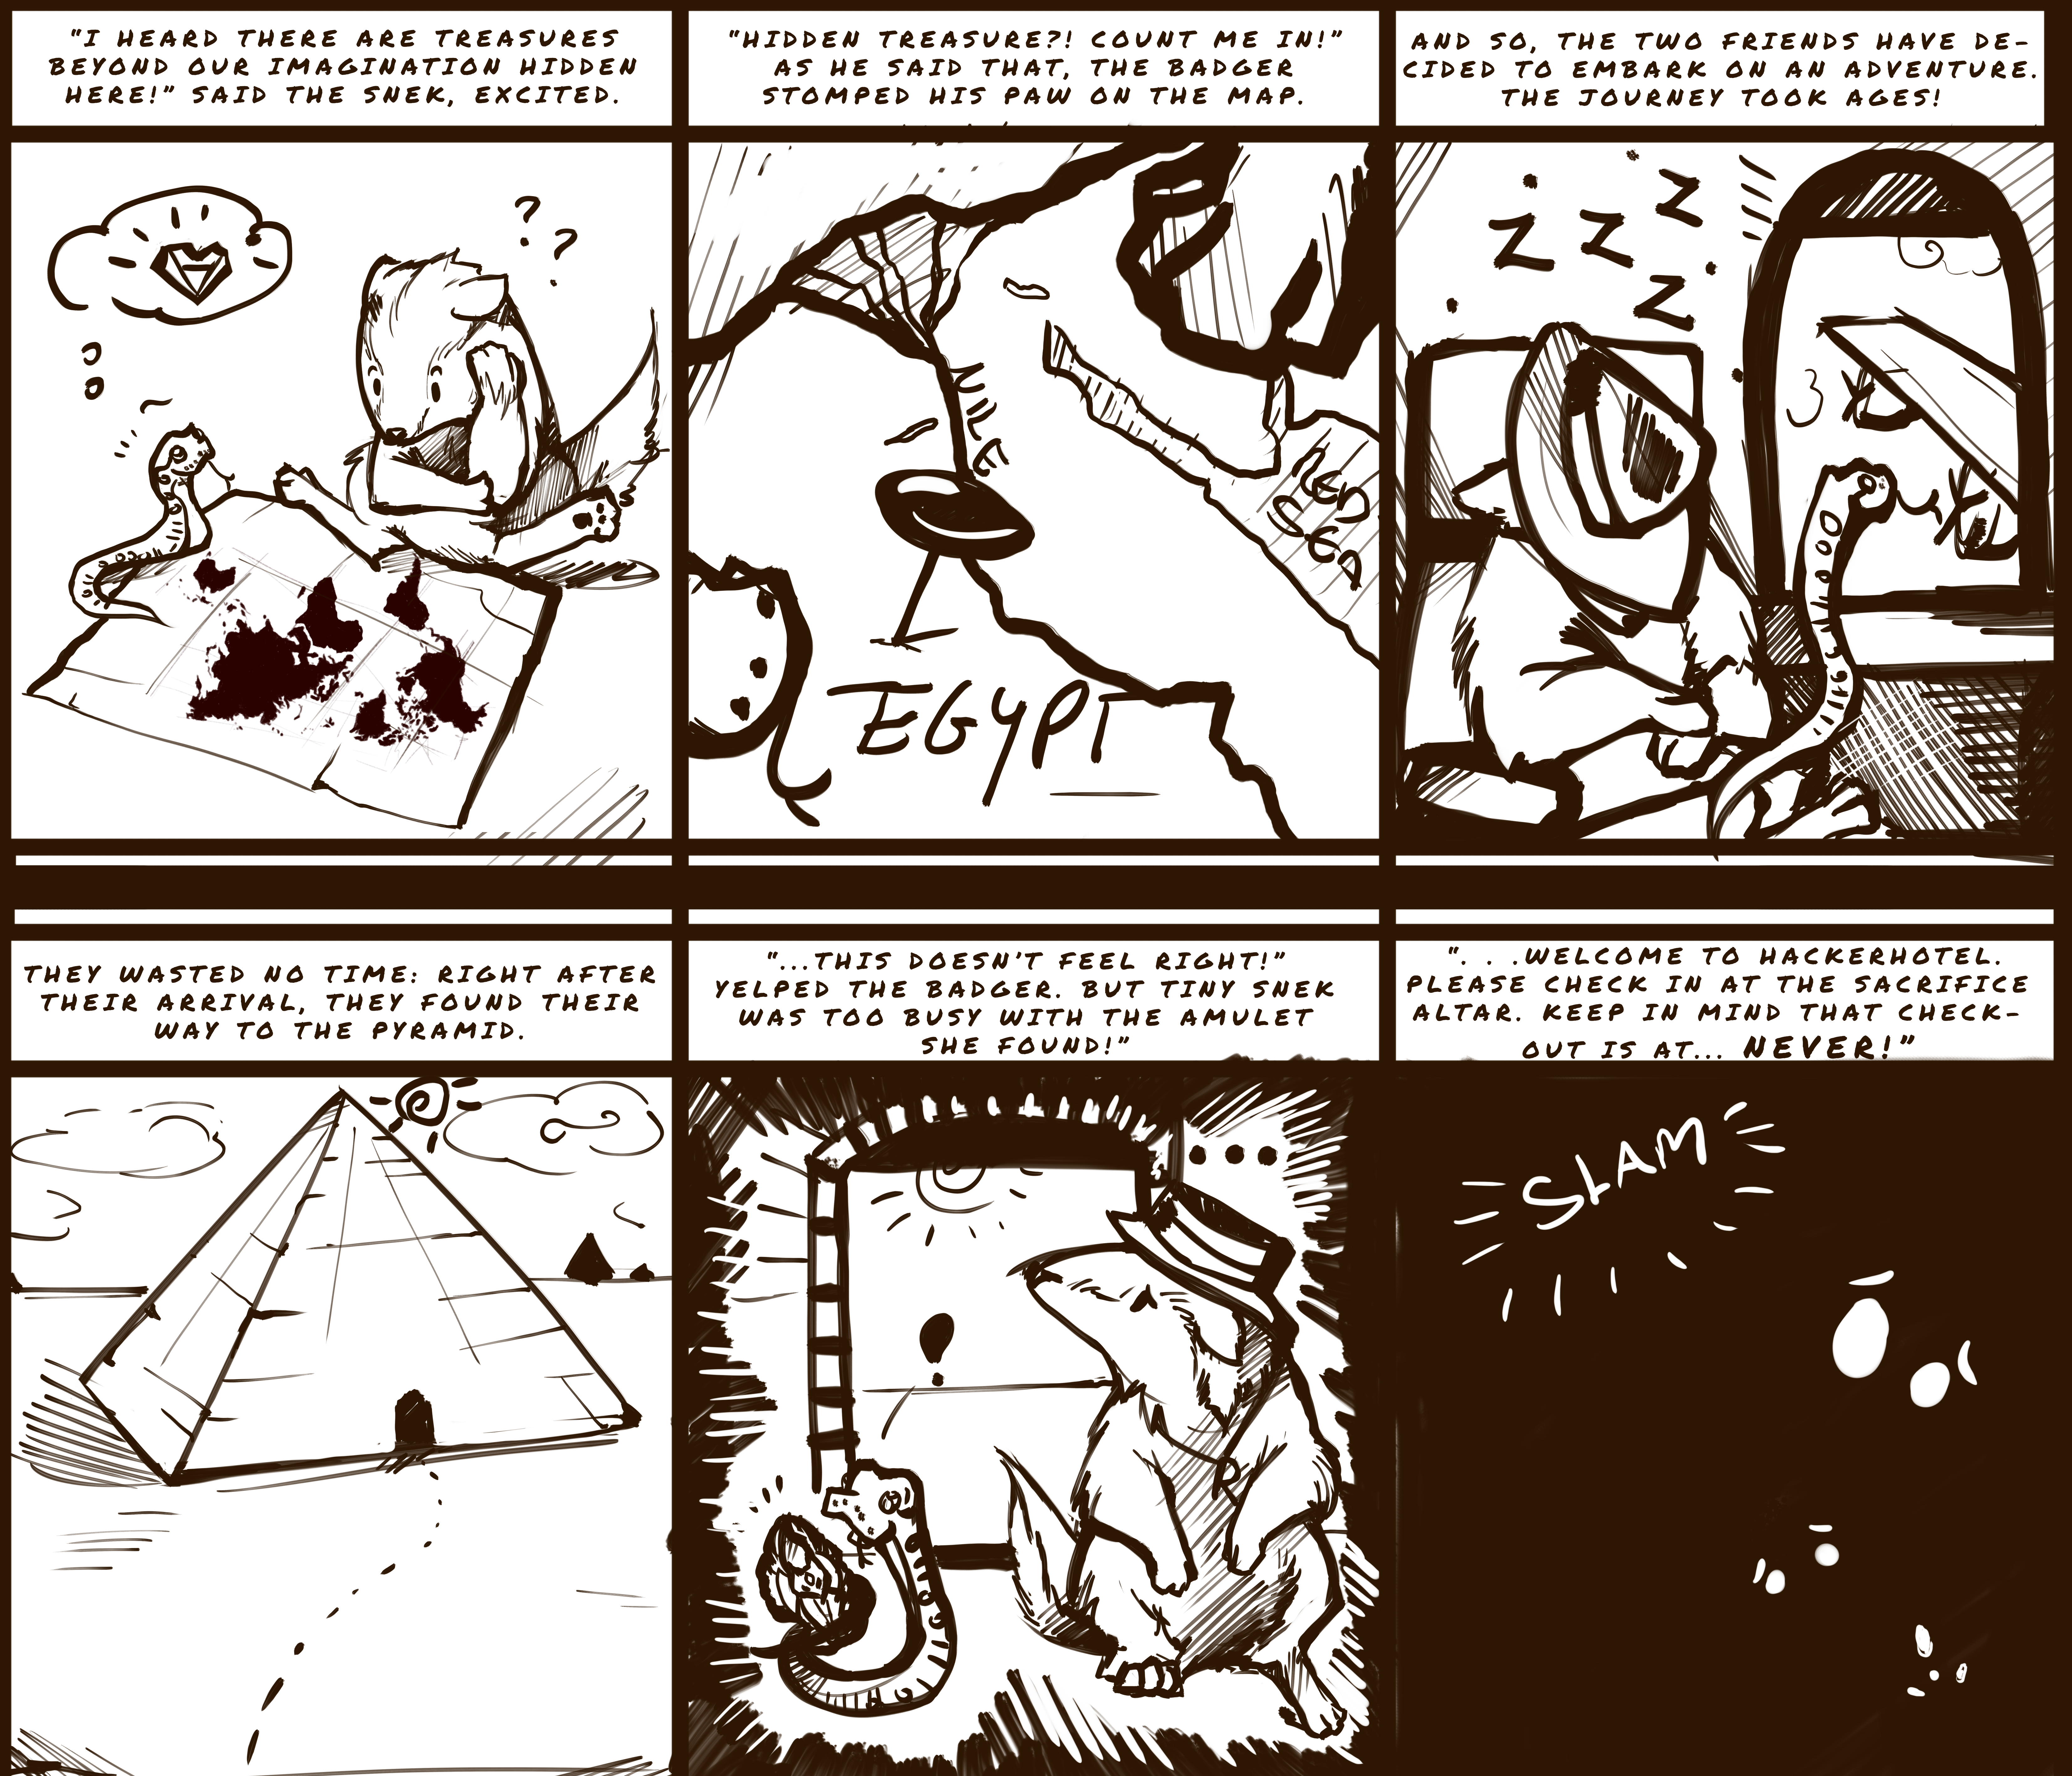
The story so far…

comic

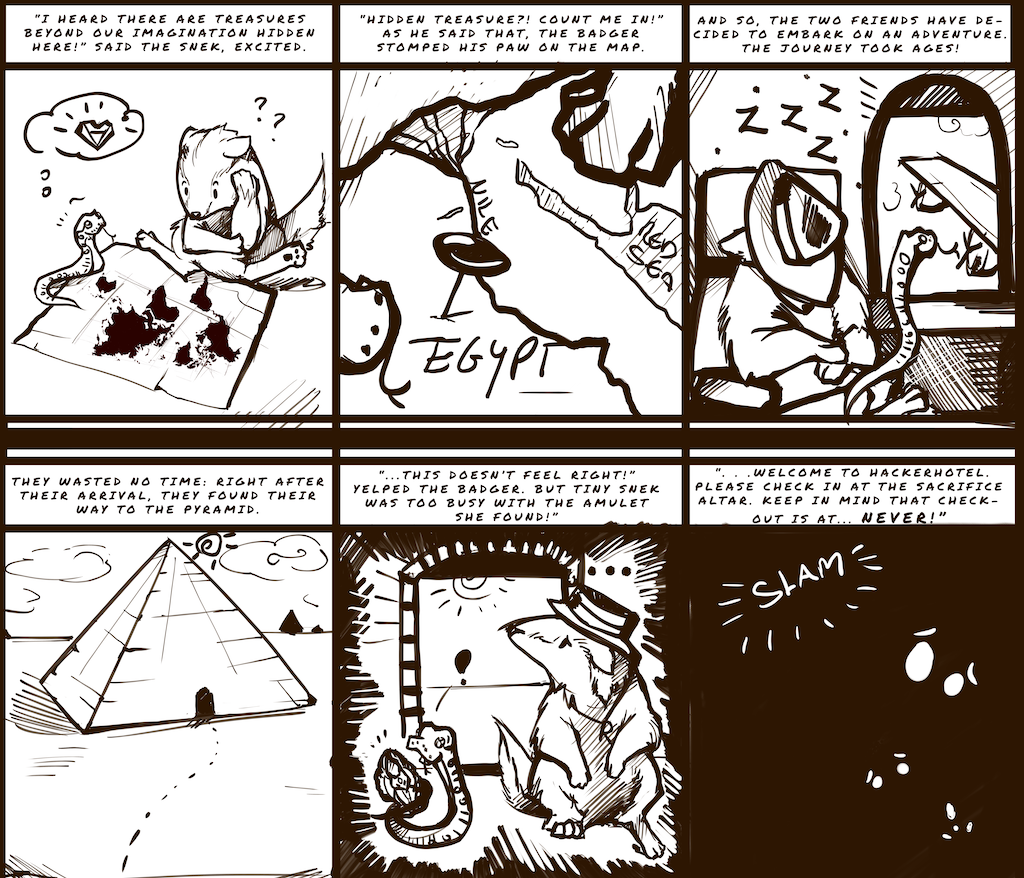
Want a big version to make a poster? Click here

In the bag

Your badgekit contains all the essentials:

  • badge
  • lanyard
  • batteries

If you forgot to bring your USB to Serial adapter, you can pick one up at the badge hacking area if needed. We didn’t buy 350 of them, so please only pick one up if you need one!

The same goes for the headphones. They won’t be in the bag, but pick up a pair if you need one. Note: ours won’t be as nice as the one you already have!

Getting started

Did you just receive your badge at the event? Great! Plug in the batteries and you can start playing the minigames on the badge right away. There are four buttons on the front of the device using which you can control the games. Good luck figuring out how it works, as we’re leaving that part as a little secret!

Please pay attention to the batteries when plugging them in. Orient them like so: batteries.png

Before plugigng in shitty addons please read the notes mentioned in the Errata section of this page!

Please do not bring front of badge in contact with anything metallic. All exposed metal is GND, and the battery-terminals poke out. Short them: battery overheats. When storing badge: please remove batteries.

Playing the game

To play the “escape from Hackerhotel” challenge you need to connect your badge to a computer. You can do this by connecting a USB-serial converter with 3.3 volt signal levels to the GND, RX and TX pins of the shitty-addon (SAO) connector. The TX pin is the pin transmitting data to your computer, the RX pin is for sending data from your computer to the badge.

The badge will present you with a text entry prompt when you connect to it using a terminal emulator configured for 115200 baud, 8-bit data width, no pairity bit and 1 stop-bit (115200 8n1). You might have to type an “h” followed by ENTER to get the badge to show it’s prompt.

Installing a terminal emulator

Errata

Some mistakes were made both in the design and during assembly, which we couldn’t fix in time for the event.

Troubleshooting

3 red lights

redlights Two red eyes and a red diamond an an unresponsive badge are the notification that the EEprom has been corrupted. Either you broke it, the code broke it, or it was another fault. No worries, visit a friendly Badge.team member and they can program that chip for you in under 15 seconds!

SAO

The SAO (shitty add-on) connector has been placed on the bottom of the badge, while it was intended to be placed on the top side. This means that the pinout of the SAO connector is mirrored when compared to the SAO specifications. The pinout mentioned on the silkscreen of your badge does properly match the connector, so no worries there. Should you want to plug in a shitty-addon, then you will have to remove and replace the connector.

At the badge assembly, both during Hackerhotel 2020 and during future events where we attend we will be sure to take some extra SAO connectors with us, together with the necessary equipment for doing this small rework step.

Undo the rework (if you want to)

Other mistakes are more visible, but less obvious: we’ve mirrored the pinout of the LEDs on this badge. To work around this issue we’ve removed the N-mosfets used to drive the LED-matrix and replaced them with bodgewires. To get the most light intensity out of your badge and to restore your badge to it’s full potential you can flip the leds (they’re symmetric), solder some SOT23 N-mosfets back in place and re-flash the firmware to drive the LED-matrix the right way round. Doing this rework takes a lot of time (30 minutes or more), but we’re glad to be of assistance should you want to attempt this.

Get the firmware (To be released after event) and go to resources.h and enable #define PURIST_BADGE and flash following instructions.

You can find a manual for fully reworking your badge here.

CYBER SCARAB

Our friends at Tilde Industries made a very nice addon for the badge. Find out more on their website.

The team

The HackerHotel 2020 badge would not have been possible without the help of these amazing volunteers.

1 - Connecting on Linux

We get it. The square black Lenovo is still number one 😊

Preparations

We assume you’re running a modern version of Linux.

Picocom

Install Picocom using sudo apt install picocom or yum install picocom or dnf install picocom or pacman -S picocom or emerge -atv picocom which ever looks familiar.

Done. It’s that easy.

Connecting to your badge on Linux

Plug in a USB-Serial board, and maybe install some drivers to get it working.

On your terminal type ls /dev/tty.* and hit enter:

  • Serial chips are usually labeled /dev/ttyUSB0

If your USB-Serial doesn’t show up in /dev/tty*then the driver hasn’t been installed or isn’t working properly (or you have a dead USB port or a dead USB-Serial)

Connect the 3.3v and GND to the header on the back of the badge. Connect the RX of the badge to the TX of the USB-Serial, and the TX of the badge to the RX of the USB-Serial.

Using Picocom

Picocom is a bit spartan. Start it using

picocom --imap delbs -b 115200 /dev/ttyUSB0

Instead of /dev/ttyUSB0 you should possibly use the device name you found earlier.

When you see a blank screen, press the Enter key twice. A welcoming prompt should be displayed.

Type in ? and get going in the awesome experience. Type in a and verify the symbols you see match the symbols you see on the badge. If you get question marks in blocks, weird symbols etc, your locale is not set right.

Press control-a and then control-h to see Picocom help

Press control-a and then control-x to exit Picocom

Setting Locale (troubleshooting)

2 - Connecting on Mac

We get it. The fruity aluminum and glass has a certain appeal. However getting a decent serial connection is a bit of work. Not really hard and a nice way to get started with serial hacking on your Mac!

Preparations

We assume you’re running a modern version of Mac OS. First we’ll install brew (if you already have it, just skip ahead.

Brew

Visit https://brew.sh and use the oneliner you find there to install it. It will take a bit of time but you’ll love it!

Brew is the installer every Mac should ship with. A ton of open source apps will become available to you without the hassle. Just type in brew install $appname and it will happen!

Picocom

Install Picocom using brew install picocom.

Done. It’s that easy.

Connecting to your badge on Mac

Plug in a USB-Serial board, and maybe install some drivers to get it working.

On your terminal type ls /dev/tty.* and hit enter:

  • CP210x chips are usually labeled /dev/tty.SLAB_USBtoUART
  • CH340 chips are labeled …
  • FTDI chips are labeled …
  • Prolific 2303 chips should just die. Please discard.

If your USB-Serial doesn’t show up in /dev/tty.*then the driver hasn’t been installed or isn’t working properly (or you have a dead USB port or a dead USB-Serial)

Connect the 3.3v and GND to the header on the back of the badge. Connect the RX of the badge to the TX of the USB-Serial, and the TX of the badge to the RX of the USB-Serial.

Using Picocom

Picocom is a bit spartan. Start it using

picocom --imap delbs -b 115200 /dev/tty.SLAB_USBtoUART

Instead of /dev/tty.SLAB_USBtoUART you should use the device name you found earlier.

When you see a blank screen, press the Enter key twice. A welcoming prompt should be displayed.

Type in ? and get going in the awesome experience. Type in a and verify the symbols you see match the symbols you see on the badge. If you get question marks in blocks, weird symbols etc, your locale is not set right.

Press control-a and then control-h to see Picocom help

Press control-a and then control-x to exit Picocom

Setting Locale (troubleshooting)

3 - Connecting on Windows

We get it. You re a gamer. Or thing you don’t have time to debug Linux drivers or don’t have the money for a Mac.

Preparations

We assume you’re running a modern version of Windows.

PuTTY

Download PuTTY from https://www.chiark.greenend.org.uk/~sgtatham/putty/latest.html

Install PuTTY.

Connecting to your badge on Windows

Configure the PuTTY menu as follows:

  • Under Connection type, select Serial.
  • In the Serial line field, enter the COM# for your board, such as COM7.
    • Note: If you did not identify your COM# when setting up your board, navigate to the Device Manager and check for an entry called USB Serial Port
  • In the Speed field, type 115200
  • Click Open.

Using PuTTY

When you see a blank screen, press the Enter key twice. A welcoming prompt should be displayed.

Type in ? and get going in the awesome experience. Type in a and verify the symbols you see match the symbols you see on the badge. If you get question marks in blocks, weird symbols etc, your locale is not set right.

4 - Playing after the event

badge

Mixed reality

Since the Hackerhotel 2020 badge game features some mixed reality elements, you will run into some parts in the game where you will need interact with some elements that were only available during the event.

This page will assist you in working around those challenges so you can complete (or start) the game on your own.

The magnetic maze

When you have read the picture frame in the reception, the hall sensor on the badge is activated to play the magnetic maze in the recption of the real hotel. As you don’t have access to the picture frame with the magnetic maze, here is a picture of it with the magentic orientation of all the magnets behind the hieroglyphs. Use a (strong) magnet to enter a sequenze of N/S orientations to the badges Hall sensor. Please note that it does not matter if you start with N or S, the game just looks for a sequence of same/different magnetic fields.

walk-like-an-egyptian

Connecting to other badges (sometimes referred to as badge-sex)

During Hackerhotel, jack-2-jack cables were available to connect the badges together. We devided all badges in four types (Anubis, Bes, Thonsu and Thoth). You had to connect to all three other badge types to form a team. Without being a team, the Guard in the Dungeon will not give you the hints you need to decide what to offer at the Altar.

If you have not been able to connect to all the other badge types, there is a cheat code that can be used to simulate that you did. Enter #124W9 in the game to make sure your badge thinks it has connected to all other badge types so that you can continue the game in the Dungeon.

Make the right offering to the high-priest

In the dungeon you will encounter a guard and an altar. The guard gives you some hints, but you need the hints given to all 4 badge characters to solve the puzzle and make the right offering to please the high-priest. So to be able to solve this puzzle on your own, here are the 4 parts of the hints that are given to each badge character:

Anubis receives the following hints from the guard:

  • Khonsu will offer Incense
  • The one who kneels 3 times will bring element Water.

Bes receives the following hints from the guard:

  • Khonsu will kneel more than once.
  • The one who offers Incense will bring element Fire.

Khonsu receives the following hints from the guard:

  • Bes will bring element Air
  • Anubis will be kneeling once more than the one bringing element Earth

Thoth receives the following hints from the guard:

  • Anubis will bring a Robe as offering, he will not kneel 2 times.
  • The one bringing the element Air will offer something other than Fruit

When you do your offering, you will be asked how many times you kneeled and which element you will bring with you. This will result in a code that you will need later. Here is a python script that will generate the codes for you.

#!/usr/bin/env python3
  
badges = ['a','b','k','t']
badge = ""
while not badge in badges:
    inp = input("Are you [A]nubis, [B]es, [K]honsu or [T]hoth? ")
    badge = inp.lower()[0]
badge = badges.index(badge)

offerings = ['w','r','i','f']
offering = ""
while not offering in offerings:
    inp = input("Are you offering [F]ruit, [I]ncense, [R]obe or [W]ine? ")
    offering = inp.lower()[0]
offering = offerings.index(offering)

elements = ['e','a','w','f']
element = ""
while not element in elements:
    inp = input("Will you bring [A]ir, [E]arth, [F]ire or [W]ater? ")
    element = inp.lower()[0]
element = elements.index(element)

kneelings = -1
while kneelings < 0 or kneelings > 3:
    inp = input("How many times did you kneel? ")
    kneelings = int(inp)-1

answer = ((offering  & 2) << 19) + ((offering  & 1) << 8) + \
         ((element   & 2) << 15) + ((element   & 1) << 4) + \
         ((kneelings & 2) << 11) + ((kneelings & 1))
answer = answer << (3-badge)
print("Your part of the code is {}".format(answer))

If you don’t have python3 on your system, you can execute this code online at https://repl.it/languages/python3

Picture frames

There were two other picture frames spread accross the bar. Use at your own risk ;-)

picture 1 picture 2

That’s it folks…

With these hints and tricks you should be able to play the whole badge adventure! Good luck and have fun!