ESP-IDF getting started
Programming native applications on the Badge requires an ESP IDF to be installed. IDF stands for “IoT Development Framework” and is Expressif’s SDK which provides:
- convenient access to hardware functionality
- implementation of protocols such as TLS, HTTP and MQTT which are commonly used in IoT projects
- common utilities such as logging, error handling and JSON parsing
- infrastructure code for building, flashing and debugging.
The IDF will be installed automatically (via git submodules and make commands which we will point out) but it does require some dependencies to be installed.
Installing Prerequisites
How to install these prerequisites is described on the IDF documenttion page for:
The instructions will (mainly) install git, cmake and python. Remember you DO NOT have to install the IDF!
In order to sideload the apps you develop, you will be using our webusb
tools. These tools will get
automatically installed, but require pyusb to be installed. This can be
installed with pip install pyusb or apt install python3-usb
Download & build the “template app”
We created a basic Hello World template app that’s intended to be used as a basis for native badge apps you build. To allow you to get started quickly, the template app downloads the IDF in the required version, as well as some badge specific components you will.
To clone the template app, open a shell:
$ git clone https://github.com/badgeteam/mch2022-template-app my_fancy_app_name
$ cd my_fancy_app_name
The
Makefile
in the template app contains a number of targets for your convenience:
prepare: Download all the ESP32 dependencies needed to build, you only need to run this once!build: compile the codeinstall: install the app you just compiled (NOTE: if you have previously used the IDF to build ESP32 code, this is different from regular flashing! see below)monitor: connect to the ESP32 console and look at your log files.
$ make prepare # this downloads all the dependecies and may take a couple of minutes

$ make build   # this compile your app
$ make install # this installs the successfully compiled app to a connected badge.

# you really only need '$make install' because it depends on `install`.
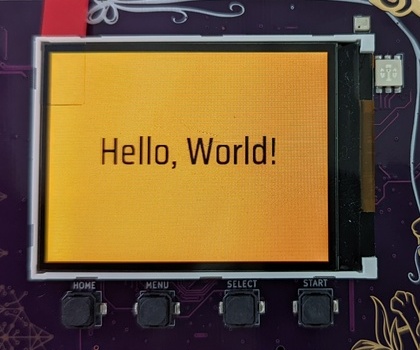
It will take a couple of minutes to download all the components. Once completed, a simple app showing “Hello, World!” will run on your badge.
Difference to “normal” IDF
If you have previously used the IDF, you may have noticed that we don’t use idf.py flash to
install the app on the Badge. (And if you haven’t, you can safely skip this section. :)
The idf.py flash command assumes that the binary to flash is the main
application for the device. This is not the case for the Badge, though. The
main application is the
launcher app, i.e. the
app with the menu that starts by default. The make install target of the
Makefile copies our newly created app into the
appfs
instead of overwrting the launch. Once copied to the appfs, the launcher can
find it and the app should appear in the apps menu.
Obviously you can use idf.py flash but you’ll delete the launcher
app and would need to reinstall it later.
Customizing the template app
Finally! Now that we have all the bureaucracy taken care of, we’ll start off by
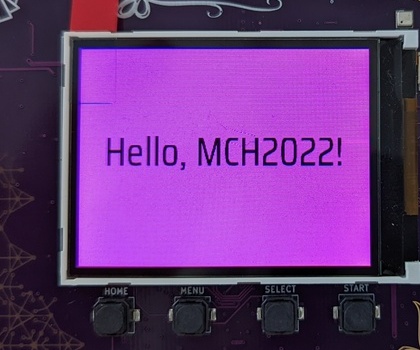
modifying the message printed to the screen. Have a look at this
line
of main.c, you can see the text shown on screen:
//...
        // This text is shown on screen.
        char             *text = "Hello, World!";
//...
This part is responsible for drawing the text to the screen. Go ahead and try to edit the text, here shown as “Fancy App!”:
Reading the buttons
The buttons on the Badge are not directly connected to the ESP32, instead they are read by the rp2040 coprocessor via I2C. Have a look in the esp32-component-mch2022-rp2040 component in case you are interested in the details.
The button handler starting on this
line
of main.c currently causes the app to exit and return to the launcher
whenever the HOME button is pressed.:
        //...
        // Await any button press and do another cycle.
        // Structure used to receive data.
        rp2040_input_message_t message;
        // Await forever (because of portMAX_DELAY), a button press.
        xQueueReceive(buttonQueue, &message, portMAX_DELAY);

        // Is the home button currently pressed?
        if (message.input == RP2040_INPUT_BUTTON_HOME && message.state) {
            // If home is pressed, exit to launcher.
            exit_to_launcher();
        }
        // Is the home button currently pressed?
        if (message.input == RP2040_INPUT_BUTTON_HOME && message.state) {
            // If home is pressed, exit to launcher.
            exit_to_launcher();
        }
        //...
Let’s change this behaviour so the screen is briefly pink after pressing the A button.
Graphics for the badge are handled by a library called Pax, if you want to dig deeper
have a look at the docs here
Pax uses the same RGB (well, ARGB, to be precise) hex triplets as HTML.
0xeb34cf is beautiful MCH pink.
//...
        // Button handling.
        if (message.input == RP2040_INPUT_BUTTON_ACCEPT && message.state) {
                // Make a pink background.
                pax_background(&buf, 0xeb34cf);
                // Update the screen.
                disp_flush();
                // Wait for half a second.
                vTaskDelay(pdMS_TO_TICKS(500));
                // After this, it loops again with a new random background color.
        } else if (message.input == RP2040_INPUT_BUTTON_HOME && message.state) {
            // If home is pressed, exit to launcher.
            exit_to_launcher();
        }
//...
Using WiFi
The template app you’ve been playing with has a simple WiFi connection API.
First, empty the while loop so it looks like this:
//...
    while (1) {
        // Await any button press and do another cycle.
        // Structure used to receive data.
        rp2040_input_message_t message;
        // Await forever (because of portMAX_DELAY), a button press.
        xQueueReceive(buttonQueue, &message, portMAX_DELAY);

        // Is the home button currently pressed?
        if (message.input == RP2040_INPUT_BUTTON_HOME && message.state) {
            // If home is pressed, exit to launcher.
            exit_to_launcher();
        }
    }
//...
Instead of writing “Hello World” to the screen, we will modify the code to
change the background color to indicate our Wifi connection status. Call
wifi_connect_to_stored() to connect to WiFi and set the background color
depending on whether the function returned successfully.
//...
    // Init (but not connect to) WiFi.
    wifi_init();
    // Now, connect to WiFi using the stored settings.
    bool success = wifi_connect_to_stored();
    if (success) {
        // Green color if connected successfully.
        pax_background(&buf, 0xff00ff00);
    } else {
        // Red color if not connected.
        pax_background(&buf, 0xffff0000);
    }
    disp_flush();
//...


What you want to do with WiFi varies a lot, so we can’t explain that here. But if you have other libraries that need WiFi (for example an MQTT client), you start them after this code.
Sharing is caring!
Now you’re ready to publish your app in the Hatchery. Follow these instructions to publish your app.
For further information: